Thursday, January 26, 2012

Inside, Outside, Upsidedown

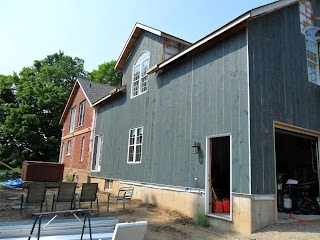
It has been almost a year since my last posting, as I have been reminded on many occasions.  It is not that we haven't been working on the schoolhouse more so the progress has not been dramatic or as interesting.  After finishing the main room floor and with the weather improved, we  moved to working on the exterior and now are back inside finishing the interior and then in a couple months, will finish the landscaping.  
In explaination of this blog's title....this will be the outside blog and then there will be the inside blog in a couple of months and finally the upside down blog which will be the final blog showing the before/after comparison photos of our project.  Okay so it's kind of goofy but the creative neurons are on vacation.   

A crappy job of removing the old cistern from the side of the schoolhouse.  It was used as a catch basin for water prior to indoor plumbing.  There was an access inside to retrieve water for washing up.


This is Ross putting the final siding boards.  It's a long way up trust me and the scaffold is very shakey.  Yes, Ross has balls and look I just noticed there is a rainbow in the picture...strange. 


We have a habit of putting the cart before the horse as the saying goes....yes that's our hot tub....priorities people!!!


I included this picture to show my fab parging job. 


Next, we framed out the windows, doors and roof line for the aluminum casing and fascia board.


The outdoor lights are hung and speaker wire and vents to be extended through the deck.


The aluminum work on the front addition.


And here they are, the aluminum guys.


The finished soffit, fascia and eaves troughing.


Starting the structure of the lower deck.  And there he is....Jakey my boy checking on the level.


This is Ross, thinking on his feet...ha ha....don't blow a fuse man.
Back to the siding.  Time to put the battens on the joints and for me to get painting.
The bottom structure of the deck is done and now we start the structure of the second storey.
Jakey can not resist a string line.
Putting up the floor joists.


" I've got the ball....now to unravel the string...he he he"


"My work is done...now a nice cat nap"


Whoo hoo....some landscaping...hey somebody painted the front door....that would be me!


Our truck load of stones, excited!!!


Ross seems to have all the fun but Jakey is making sure he lets him know he wants a turn driving the machine.  I do not get a turn....cause I'd probably run into the house in a moment of panic figuring out where the brakes are...everyone should know their limitations right Ross?


Gravel laid.... check, level taken..... check, first corner stones placed..... check, rain begins..... check, muddy mess..... check, quitting time!

After a week of heavy lifting.....success.


October 31, 2011....we planted our grass seed and believe it or not we have baby grass growing mid November.  That tells you how mild a winter we had this year.

A final photo of our deck with the boards on and ready for construction of railing and stairs in the spring.

Friday, February 4, 2011

Once Upon A Time, There Was A Floor....

Once upon a time.... a long time ago.... there was a little red brick schoolhouse. All the little children who lived nearby, walked to the school through rain, shine, snow, sleet, mud and s#%t to learn their A B C's. For over eighty years, they walked upon the maple floors leaving behind the muck from their footwear. One day, the powers that be decided to send the little children to a new and bigger school and the little red brick schoolhouse became a little red brick community centre. But...because the floors were so grimy and dirty, a new floor had to be placed overtop of the old. The new floor remained for over 50 years...so long that the people forgot about the old floor underneath. Then one day, a very insane young (snicker) couple bought the schoolhouse and......

The floor beneath the floor. Both are maple, the top 1" strip and underneath are 3 1/2"wide 1 1/4" thick.


Removing the strip flooring was a major demo job. It took many days of prying up the individual strips and removing all the nails left behind....and there was a shitload.....and then the clean up.

The next step involved prying up the 3 1/2" maple and denailing all the boards. The maple was laid directly on the floor joists on 2' centres so we reinforced the floor with cross pieces and new tongue and groove plywood.
Look...no floor and no roof...we were lucky the rain , for the most part, held off.
Ross finishing off the last of the subfloor with his two favourite tools, his power nailer and sledge hammer. Well, that's that for the next six months. The old flooring was stacked and re-stacked and unfornately for me re-stacked once again and left until we took care of more important things like toilets (yah!!), and walls and heat and lighting.
It's now January 2011 and the kids are back at university. Our two weeks of holidays, relaxation, food and drink are over. Remember my little story at the start of the blog....well, this is that grime hardened on the tongue and groove of the boards. It needs to be scraped by hand (my hand) so the boards can be tightly reassembled.
This is after the scraping. It took about three weeks to clean the 2400 linear feet. It was a dirty dirty job.
Hey, that's me trying to look like I'm enjoying my work. At this point, I was sincerely questioning my sanity...who does this shit???? The only worse job was the insulation removal...better be worth it eh!
Ross has such a look of concentration on his face. We needed to sand all four sides to further clean the edges and check for missed nails. I think the only reason he agreed to this crazy project was because he got to buy a whole lot of power tools....AAARRRR!!!!
The next step was planning the top of the boards. This removed some of the grime and gave the boards a more consistent thickness. Looking back, Ross and I agree we should have planed a few more times.

Now that we have the boards cleaned, it's time to get it down. First, we stapled down heavy flooring paper. I forget why we put it down...maybe as a make work project or to give me an opportunity to slam the staple hammer onto my thumb. Whatever the reason, I'm no longer allowed to use the staple hammer...not that I want to....I can find other ways to hurt myself don't you worry now.
Ross using the flooring hammer to attach the boards through the tongue...look ma no nails!

The last board!!! Look at those sexy man knees...someone needs new jeans.
Your probably thinking right now....that's one ugly floor...what were they thinking....you just wait for the magic. Hey...it's Fabbie!!!
Do you remember snowmeggadon last Wednesday? It was so bad in Alliston, it was like a blizzard inside as well. Actually, thats a whole lot of dust. The vaccuum on the drum sander kept clogging. We had to stop every few minutes to clean out the machine. Smarty pants fixed the problem...there was a piece of paper jammed in the vaccuum intake that was blocking the suction....someone returned the rental without cleaning it....shame!!! After that set back, things got a whole lot better.
So we sanded for two ten hour days and still had low spots that Ross had to use the edge sander to clean out. Our backs were so stiff and sore we could barely move....Ibuprofen for everyone!!
Looking a little better
Looking a lot better.
Hardwood such as maple does not stain very well, it tends to stain blotchy. After doing a little surfing on the web, we discovered a 2part shellac 1part methyl hydrate mix that will seal the grain and allow the stain to evenly coat the wood. After it dries, a quick sanding and we are ready to stain.
The stain is finished up to the white cloth. We stopped at intervals to wipe the excess stain off the floor; on hands and knees.
We found this floor buffer in the basement. It's from the 1960 but it worked like a charm to buff the stain into the surface.
Applying the first of three coats of varnish. We used Fabulon; the finish used for bowling alleys. It will give a very nice hard finish.
After three days of fumes, sanding and recoating we are done!!! So the moral of the story....don't try this at home!!!